Quick installation guide
This page explains how to install your own reTHINK domain to be able to deliver your own Hyperties, Protostubs or Data Schemas. After following this tutorial, you will be able to run all Hyperties Demos from the catalogue available here.
Please note that this section is dedicated to an operational platform. Developers should use the toolkit.
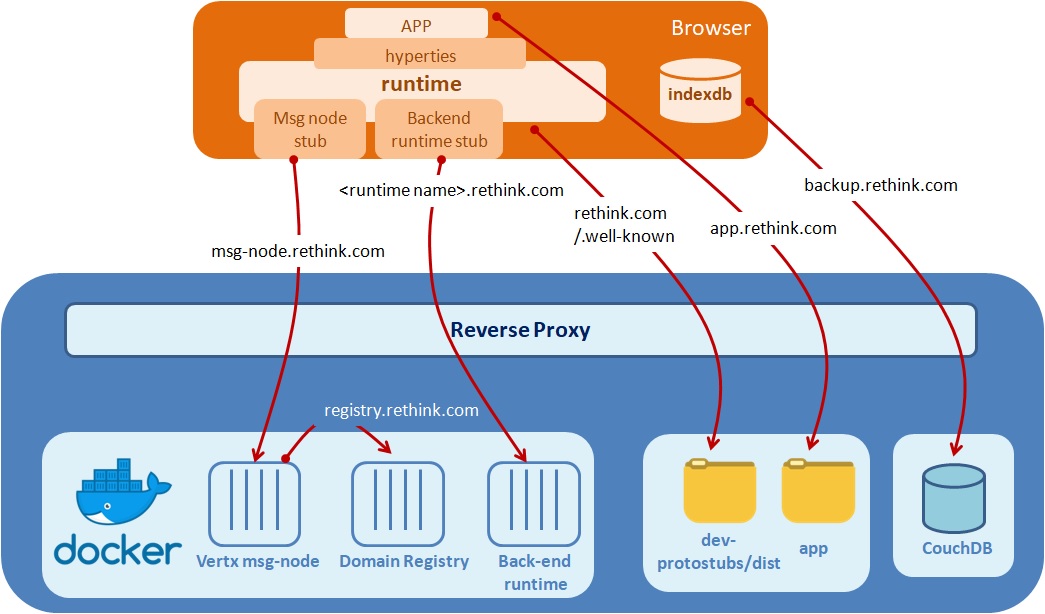
The reThink Framework platform uses three main core back-end services - Message Node and Domain Registry - and optionaly two additional backend services, the Java backend runtime, Vertx Runtime, to support Hyperties executed at the backend and the Backup service to backup data stored in browser runtime, as depicted in the picture below:
The two 2 back-end services and the Backend runtime, are available in Docker images and the preferred host is an Ubuntu 14.04 or CentOS.
It is recommended that the containers are deployed behind a reverse proxy for several reasons:
– default DNS is used to access different components of the platform, adding a prefix. The reverse proxy can easily manage different virtual hosts thus simplifying access to these services.
– All back-end services are using different ports, using a reverse proxy is useful to allow using classical ports
– It is recommended that the certificates are managed on the front reverse proxy.
Requirements
Some tools/servers to install:
– apache2
– or nginx instead of apache2
– reverse proxy for Apache in case of on apache2
– or ReverseProxy for nginx config for nginx
If you choose a default apache2 server, for each sub-domain you need to use a config file, where you config the reverse proxy, you can check here a config for registry component.
– - Node.js and Npm
– certbot: https free trusted certificates can be obtained on let’s encrypt
– You need to have DNS configured for your host domain and for four sub-domains: registry, msg-node, backup and <backend runtime name>.
Installation process
Docker Services: Message Node; Domain Registry and Vertx Runtime
To illustrate our text, we will consider that the DNS of the domain is rethink.com. Currently there are four implementations of the Message Node but only one is necessary to be installed. In this guide we use the Vertx Message Node.
Deploy reTHINK back-end services with Docker Compose. Get the docker-compose file and execute:
docker-compose up -d
Notes for other Message Nodes deployments
- nodejs installation: the docker-compose must be configured. If you use the script “start.sh”, it will also build the domain registry. The url to provide in the “environment” section is the domain of the plateform (here csp.rethink.com).
- no Matrix installation: after building the docker image, the simplest is to use the dockerStart.sh script. Be carefull to enter the good folder for the volume mapping, suppress the parameters –net=rethink -p 8001:8001 when used with a proxy. Note also that the default is exposed on HTTP on 8001. The MatrixProtoStub example is showing an URL of WebSocket with wss on 443, which is what the reverse proxy will provide.
- multiple installations of msg-node-vertx on the same machine to serve different servers they can’t be installed on the same network (use for example 172.18.0.2 and 172.19.0.2)
Setup Dynamic reTHINK libraries (Protostubs, Idp Proxies, Hyperties and Runtime Core)
According to reTHINK protocol on-the-fly concept, network protocols and service logic running in the browser are dynamicaly deployed in the runtime just when required by the Application.
Thus, you should:
-
clone dev-protostubs repo
-
copy the
distdirectory to standard Linux HTTP server dir that will be served by the reverse proxy:
sudo cp -R . /var/www/stubs/public_html/
It should be noted the reTHINK Runtime and Hyperty demos are also included in such distribution.
-
configure the runtime domain at root demos index.html
-
the message-node address here
-
if required, the vertx runtime address here
-
If required, configure the different IdPs to give your domain access to it. The google idpproxy provided is working with an account that authorizes authentication process on a test platform, which probably does not include the one under installation. This means that by default, it is not possible to use google. To be able to do this, you have to:
– the google idpproxy, change the account and secret of the google account
– authorize on this account the use of google auth API (https://console.developers.google.com/apis/), with the authorized redirect URI https://rethink.com.
BackUP Service (CouchDB)
It is used to backup data stored in the browser.
Can be installed using this tutorial.
Reverse Proxy
With all services running on different containers we need to set up the different sub-domains and point them to the correct containers.
List of sub-domains needed:
- backup
- msg-node
- registry
- vertx-runtime
- app
For each sub-domain we need to create and enable config files.
1 - enable firewall-cmd
sudo firewall-cmd --permanent --zone=public --add-service=http
sudo firewall-cmd --permanent --zone=public --add-service=https
sudo firewall-cmd --reload
2 - setup NGINX for ‘VirtualHosts’
mkdir /etc/nginx/sites-available
mkdir /etc/nginx/sites-enabled
3 - configure NGINX
vim /etc/nginx/nginx.conf
3.1 - add after the ‘http{}’ block:
include /etc/nginx/sites-enabled/*.conf;
server_names_hash_bucket_size 64;
4- configure each main domain/sub-domain by editing and adding servers on directory /etc/nginx/sites-available/
we will start with main domain
vim /etc/nginx/sites-available/rethink.com.conf
add the simple configuration
server {
    server_name rethink.com;
	#reverse proxy for protostubs main path
   location / {
        root /var/www/stubs/public_html;
        add_header Access-Control-Allow-Origin *;
    }

    #reverse proxy for Docker administration with Portained on /admin path
    location /admin/ {

        proxy_pass http://172.20.0.5:9000/;

    }

    #reverse proxy for push-server on /pushserver path
    location /pushserver/ {
        proxy_pass http://172.20.0.130:3002/;
    }
}
We use reverse-proxy to point the different services to the correct domain/sub-domain. In this case, we are using:
- the push server service, which is running on ip 172.20.0.130 and port 3002.
- and dynamically deployable stubs served as static files at standard HTTP server
/var/www/dir
We can test config files of nginx before the reload/restart of service, with command
sudo nginx -t
nginx: the configuration file /etc/nginx/nginx.conf syntax is ok
nginx: configuration file /etc/nginx/nginx.conf test is successful
5- To enable the new domain we need to create a symlink
ln -s /etc/nginx/sites-available/rethink.com.conf /etc/nginx/sites-enabled/rethink.com.conf
6- restart nginx
sudo service nginx restart
7 For each domain/sub-domain we need to get a new certificate to enable SSL.
7.1 Install Certbot Let’s Encrypt Client
sudo yum install epel-release
sudo yum install certbot python2-certbot-apache mod_ssl
7.2 Obtaining a Certificate
sudo certbot --nginx
Choose the name/names to activate HTTPS and enable redirect to 443 port to avoid connections to 80 port.
7.3 After it you could check, some changes were made to the file /etc/nginx/sites-available/rethink.com.conf
server {
    server_name rethink.com;
	#reverse proxy for protostubs main path
   location / {
        root /var/www/stubs/public_html;
        add_header Access-Control-Allow-Origin *;
    }

    #reverse proxy for Docker administration with Portained on /admin path
    location /admin/ {

        proxy_pass http://172.20.0.5:9000/;

    }

    #reverse proxy for push-server on /pushserver path
    location /pushserver/ {
        proxy_pass http://172.20.0.130:3002/;
    }

    listen 443 ssl; # managed by Certbot
    ssl_certificate /etc/letsencrypt/live/rethink.com-0001/fullchain.pem; # managed by Certbot
    ssl_certificate_key /etc/letsencrypt/live/rethink.com-0001/privkey.pem; # managed by Certbot
    include /etc/letsencrypt/options-ssl-nginx.conf; # managed by Certbot
    ssl_dhparam /etc/letsencrypt/ssl-dhparams.pem; # managed by Certbot

}
server {
    if ($host = rethink.com) {
        return 301 https://$host$request_uri;
    } # managed by Certbot

    server_name rethink.com;
    listen 80;
    return 404; # managed by Certbot
}
8 - Sub Domain config files
The set of files related to the configuration of the sub-domains is available here.
Hello World Application Deployment
The Hello World is published in the repository dev-app, and its installation manual is provided there. It can be deployed simply behind an HTTP server.
When all of this is done you can try to connect on the index.html of the hello-app. First step, you should be able to load the runtime, then to load an hyperty, then to contact hyperties.
Integration with IMS
You should follow this guide to integrate your application with IMS.